Authentication
In this tutorial we will demonstrate how to utilize Unreal to perform general authentication requests that you can utilize in your own games.
Estimated Time
Configuring Catena authentication in your Unreal project is estimated to take < 10 minutes.
Prerequisites
- You must be running Catena. It must be run locally or you must have it deployed somewhere. Instructions for doing so can be found here.
- You must have completed the Unreal Quickstart Guide.
Login
In this section we will demonstrate how to perform a login. We will use the CommonUser plugin to kick off the login flow. To learn more about the CommonUser plugin you can read this documentation.
For this login request we will be logging in using a test account.
Player Login Using Blueprints
- Run the editor
- Click
Open Level Blueprint. This can be found in the blueprint button left of the play button.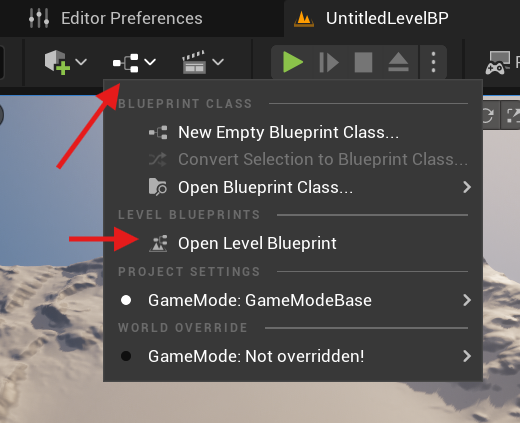
- Right-click on the Event Graph. Search for
Get CommonUserSubsystemand create the node. - Drag from this nodes return pin and search for
Try to Login User for Online Playand create that node. - Finally, connect the
Event BeginPlayexec pin to the input exec pin. Your event graph should look like this:
- Press the Play button.
You will notice in your logs for the LogOnlineServices category a response message similar to: LogOnlineServices: Successfully logged in as a test user!
With that you have successfully performed your first request to Catena!
Player Login Using C++
1. Create GameInstance Class
- Run the editor
- Click
Tools->New C++ Class - Choose
GameInstanceas the Parent Class - Click
Next - Name class for your project and set desired path
- Click
Create Class - Open your IDE to the class files you have created.
- You can find your projects
.slnfile in the projects directory. - Open the
.slnfile with your preferred editor.
- You can find your projects
- Close the UE Editor.
2. Set Your GameInstance Class As Default
In order for the engine to utilize your newly created game instance it needs to be configured in the Project Settings.
- Select
Edit->Project Settings - In the
Project Settingsmenu click on the search bar and typeGameInstance - Under the
Maps & Modessection override theGame Instance Classdefault with your newly created Game Instance.
Your project will now utilize your game instance class when playing.
3. Add functionality To Your GameInstance Class
Next we will setup the class to call login when the game is initialized. Open up your game instance class header file and add the following code:
#pragma once

#include "CoreMinimal.h"
#include "Engine/GameInstance.h"
#include "MyGameInstance.generated.h"

// Forward Declare
namespace UE::Online
{
	class IAuth;
	class IOnlineServices;
}

UCLASS()
class CATENAEXAMPLE_API UMyGameInstance : public UGameInstance
{
	GENERATED_BODY()

public:
	// UGameInstance
	virtual void Init() override;

private:
	// Online
	void Login();

	TSharedPtr<UE::Online::IOnlineServices> OnlineServices;
	TSharedPtr<UE::Online::IAuth> AuthService;
};
Next, open up the .cpp file for this class and add the following code:
#include "MyGameInstance.h"

#include "CommonUser/Public/CommonUserSubsystem.h"
#include "Online/OnlineServicesEngineUtils.h"

void UMyGameInstance::Init()
{
	Super::Init();

	OnlineServices = UE::Online::GetServices(GetWorld(), UE::Online::EOnlineServices::GameDefined_0);
	if (OnlineServices == nullptr)
	{
		UE_LOG(LogTemp, Error, TEXT("OnlineServices is null."));
		return;
	}

	AuthService = OnlineServices->GetAuthInterface();
	if (AuthService == nullptr)
	{
		UE_LOG(LogTemp, Error, TEXT("AuthService is null."));
		return;
	}

	// Kick off login request
	Login();
}

void UMyGameInstance::Login()
{
	UE::Online::FAuthLogin::Params LoginParameters;
	LoginParameters.PlatformUserId = FPlatformUserId::CreateFromInternalId(0);
	LoginParameters.CredentialsType = UE::Online::LoginCredentialsType::Auto;

	UE::Online::TOnlineAsyncOpHandle<UE::Online::FAuthLogin> LoginHandle = AuthService->Login(MoveTemp(LoginParameters));
}
4. Perform Test Login
Finally, perform the following:
- Run the UE editor using your IDE.
- Press the
Playbutton in the editor.
You will notice in your logs for the LogOnlineServices category a response message similar to: LogOnlineServices: Successfully logged in as a test user!
Logout
Player Logout Using Blueprints
Coming Soon!
Player Logout Using C++
Coming Soon!
Additional Information
Command-line Arguments
If you would like, you can pass in command-line arguments when running the engine to configure the user logging in. Some available command-line arguments are the following:
-session-id=<sessionId>- This is the catena session id. This will typically be provided by the Catena launcher.UsernameOverride=<username-override>- This is the username for the test account you are overriding.- Test account usernames start with the word
testfollowed by a two digit number, like sotest01. - The default test username is currently set to
test55.
Additional Content
For more information on project structure utilizing Online Services you can refer to this documentation from Epic Games for further details and examples.