Mirror Networking
This is a guide on how to configure two Unity clients that connect to each other using the open source Mirror Networking package. It has nothing to do with Catena itself, but is supplemental material to get you up and running with a baseline Unity project that can make use of Catena's features.
Note: This guide uses code and information from Shrine's Mirror Networking series on YouTube.
Estimated Time
Setting up this demo is estimated to take <10 minutes.
Prerequisites
- Unity Editor, version 2021.3.35 or higher
Initial Setup
Install The Dedicated Server Module
- Open your Unity Project
- Open "Build Profiles" by navigating to
File -> Build Profiles - Select "Windows Server"
- Select "Install with Unity Hub" if "No Windows Server module loaded" is displayed. If not, you are done with this step.
- If you needed to install, select "Windows Dedicated Server Build Support" in the Unity Hub Window that popped up.
- Install.
- Once installed, restart your editor.
Download + Install The Mirror Sample
- Open your Unity Project
- Open the Asset Store by navigating to
Window -> Asset Store - Search for "Mirror"
- Select the "Mirror" Asset from "Mirror Networking". You can also find a link directly to Mirror here
- Select "Open in Unity"
- In Unity, select "Download"
- Select "Import"
- If prompted to "Install/Upgrade" dependencies, do so
- Import all
Download + Install ParrelSync
ParrelSync is a Unity editor extension that allows developers to test multiplayer gameplay without building project binaries. This is accomplished by having another Unity Editor window opened which ParrelSync mirrors the changes to from the original project.
- Open the Package Manager by navigating to
Window -> Package Manager - Select the
+to add a package- Select "Add package from git URL..."
- Paste the following URL:
https://github.com/VeriorPies/ParrelSync.git?path=/ParrelSync
- You will now see a "ParrelSync" option in the toolbar at the top of the Unity Editor
- Open the Clones Manager by navigating to
ParrelSync -> Clones Manager - Select "Create new clone"
- When your clone is created, select "Open in New Editor"
- Changes that are made in your original editor will now automatically be mirrored into the clone editor, which we will use later to test our multiplayer functionality
Create Your Multiplayer Experience
Setting Up The Network Components
- Select the scene you would like to add Multiplayer functionality to. If you are starting from a fresh Unity project, this will be located at
Assets/Scenes/SampleScene.unity - Create an empty
GameObjectin your Scene and name itNetworkManager - Add three components to your
NetworkManagerobject- The Mirror
Network Manager - The Mirror
Telepathy Transport (Script) - The Mirror
Network Manager HUD
- The Mirror
- Set the
Network Manager -> Network Info -> Transportto theNetworkManager (Telepathy Transport)component

- Create a new 3D Object in your scene, selecting a Cube and name it
Player - Add a component to your
Playerobject- The Mirror
Network Identity
- The Mirror
- Create a new folder in your
Assets/directory, calledPrefabs - Drag the
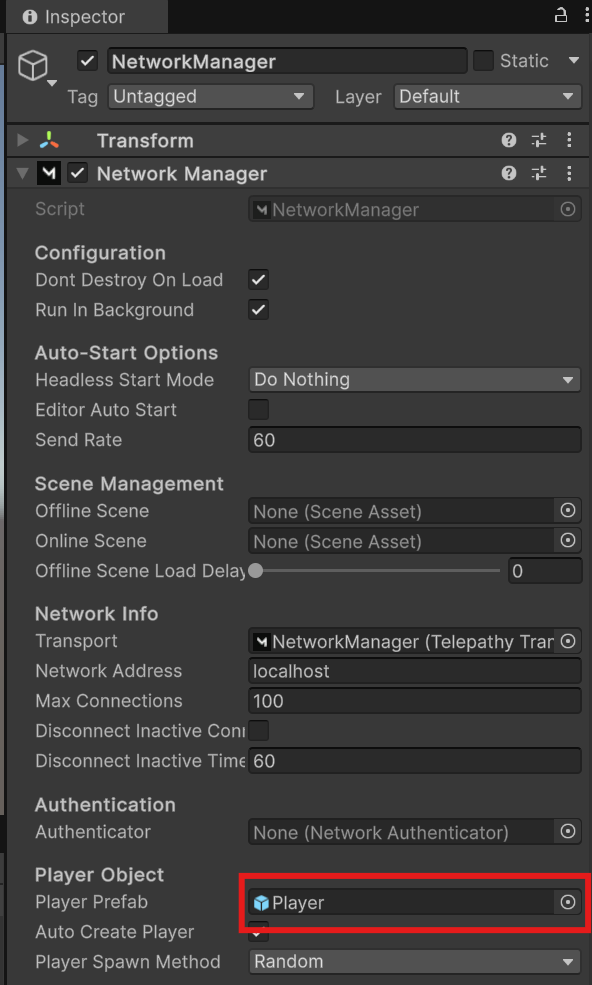
Playerobject from your scene into theAssets/Prefabs/folder, creating aPlayerprefab - Select your
NetworkManagerin your scene. Drag yourAssets/Prefabs/Playerprefab into theNetwork Manager -> Player Object -> Player Prefab
- Delete the
Playerobject from the Scene. The prefab will be loaded into the scene dynamically when players join during gameplay
Configuring Basic Player Controls
- Create an new folder in your
Assets/directory calledScriptsif one does not yet exist - Create a new
MonoBehaviour ScriptinAssets/Scripts/, calling itPlayer - Open the
Assets/Scripts/Player.csfile in your editor of choice - Replace the file's contents with the code below
using Mirror;
using UnityEngine;

namespace PlayerPrefab
{
    public class Player : NetworkBehaviour
    {
        void HandleMovement()
        {
            if (isLocalPlayer)
            {
                float moveHorizontal = Input.GetAxis("Horizontal");
                float moveVertical = Input.GetAxis("Vertical");
                Vector3 movement = new Vector3(moveHorizontal * 0.1f, moveVertical * 0.1f, 0);
                transform.position = transform.position + movement;
            }
        }

        void Update()
        {
            HandleMovement();
        }
    }
}- Back in your Unity Editor, double click the
Playerprefab to open it - Add two components to your
Playerprefab- The
Player.csscript you just wrote - The Mirror
Network Transport (Reliable)
- The
Testing It Out
- Re-open your Scene
- Press play on both your main Unity Editor and the clone that ParrelSync is mirroring to
- In one editor, select "Host (Server x Client)"
- In the other, select "Client", leaving the fields as is
- When you move your cube in one editor with WASD, you should see it move in the other editor as well
- Congratulations! You have an MVP of a multiplayer game in Unity